MyFreelap app – User Guide >
![]() /!\ We recommend that you continue to use the MyFreelap Legacy app only in certain cases. Please read this page for details.
/!\ We recommend that you continue to use the MyFreelap Legacy app only in certain cases. Please read this page for details.
![]() /!\ We recommend that you continue to use the MyFreelap Legacy app only in certain cases.
/!\ We recommend that you continue to use the MyFreelap Legacy app only in certain cases.
INTRODUCTION
• What is MyFreelap ?
MyFreelap is the place where you can view and store the data that you are tracking with your Freelap timing system. MyFreelap is an app. It is also accessible from the web on www.myfreelap.com.
MyFreelap lets you :
• Detect your Freelap devices and start a Workout to start receiving data (app only)
• View the results live throughout the Workout, and store data
• Edit your account & set up your general settings
• Create Teams & manage your start lists
• Create your custom Exercises
• Share your Workouts with other MyFreelap users
• Export data
• Download & Update
MyFreelap app is available for free. You can download it :
• On App Store
• On Google Play Store
We recommend you to always update MyFreelap app to the latest version.
• When a new update is available, you are notified on your MyFreelap account.
• To update MyFreelap app: go to the app store on your mobile device, search for “MyFreelap” and click on “Update”.
• Requirements & Compatible devices
MyFreelap app can be used in offline mode (once logged in), but it requires the activation of the Bluetooth function on your mobile device.
MyFreelap app is compatible with IOS and Android mobile devices (smartphones, tablets):
– Minimum iOS version support from iOS 13.0
– Minimum Android version support from OS version 7.0
• Languages
MyFreelap app is translated in:
– English
– French
GET STARTED
• Account & Connection
1/ Download MyFreelap app (free)
MyFreelap app is available for free on App Store and Google Play Store. From your mobile device: go to the app store, search “MyFreelap” app and download it.
2/ Create your MyFreelap account
– Open MyFreelap app and click on “Create Account”.
– Fill out the registration form, and click on “Register”.
– MyFreelap will send you a code via email to confirm your email and activate your account. Enter the activation code in MyFreelap app. If you can’t find the email, please check your SPAM folder.
Note: If the app detects that your credentials are associated with an account on the old MyFreelap Legacy app, it will offer you to import your data. It will be just an import, your data will still be available on the old MyFreelap Legacy app.
3/ Sign in to your MyFreelap account
– Enter your Username or Email, and your Password to sign in to your MyFreelap account.
– Turn on the Bluetooth and the Location on your mobile device.
You are ready to use the app!
• Pre-configuration
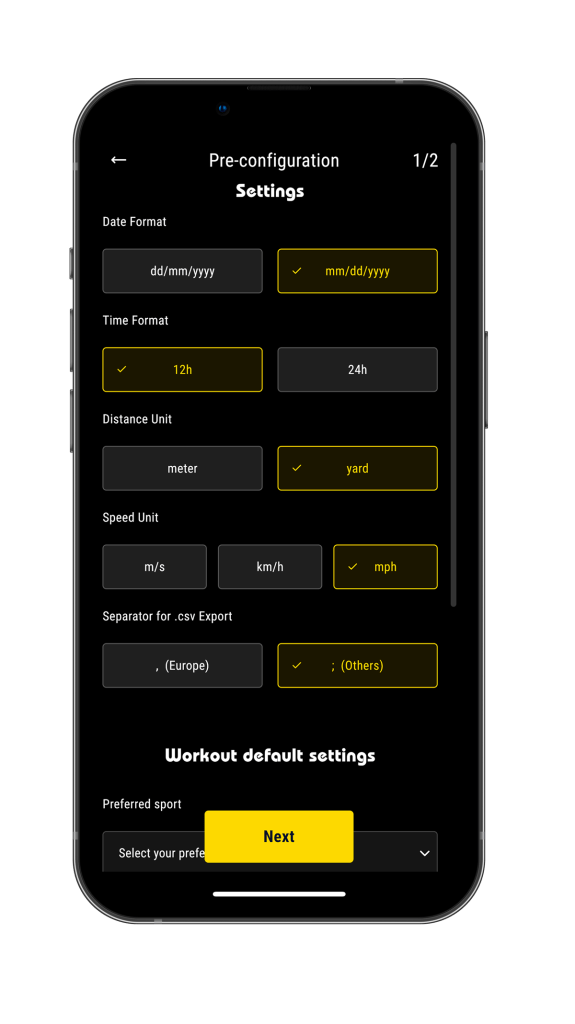
The first time you sign in, the app offers you to pre-configure your account to help you take the most of your MyFreelap app.
• Pre-configuration Step 1 : Enter your Setting Preferences
• Pre-configuration Step 2 : Enter your Chip IDs
You can skip the Pre-configuration steps and launch it later by opening the Help center.
• Quick Tutorial
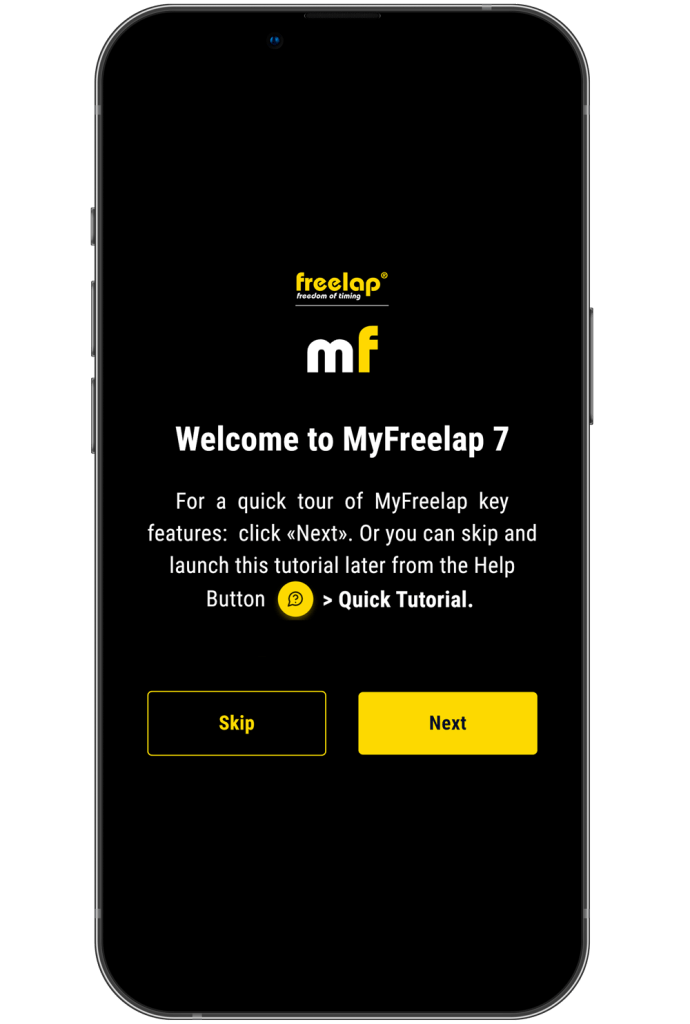
The first time you sign in, the app offers you a Quick Tutorial that explains the MyFreelap app key features.
You can read, or skip the Quick Tutorial and launch it later by opening the Help center.
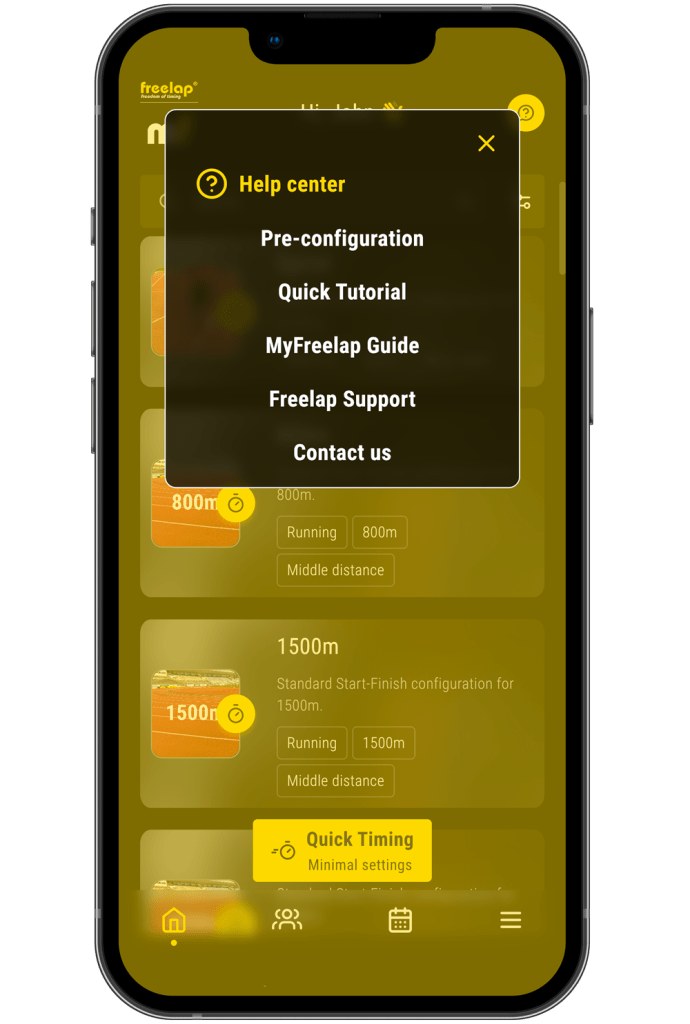
• Help center
Click on the icon ![]() at the top right to open the Help center. It lets you access to:
at the top right to open the Help center. It lets you access to:
• Pre-configuration steps
• Quick Tutorial
• MyFreelap Guide (here!)
• Freelap Support
• A link to email us
• Online mode & Offline mode
• ONLINE MODE: When you have Internet, you can access all MyFreelap features, and the data is automatically synchronized on the server. It means that you will be able to access it from any mobile devices (by logging on MyFreelap app), and from your MyFreelap web account.
![]() • OFFLINE MODE:
• OFFLINE MODE:
![]() Please note that you have to be connected to your account in online mode to use offline mode. So before to go to train, check on your MyFreelap app that you are connected to your MyFreelap account.
Please note that you have to be connected to your account in online mode to use offline mode. So before to go to train, check on your MyFreelap app that you are connected to your MyFreelap account.
When you do not have Internet, you can’t access all MyFreelap features, but you can still:
– Record new chip ID in “My Freelap Chips” section
– View (but not modify) your account and general settings
– View (but not create or modify) Teams
– View (but not create or modify) custom Exercices
– Create a Workout and receive data
– Export Workouts
When you start a Workout and receive data, data is automatically saved locally on MyFreelap app on your mobile device. As long as you don’t have internet, the data will only be accessible locally on your mobile device.
As soon as you have an Internet connection again and open the MyFreelap application, the data will be automatically synchronized and will then be available on your MyFreelap account regardless of the device from which you open it.
 SETTINGS
Enter your setting preferences to easily take the most of your MyFreelap app.
From the main bottom menu, click on ![]() .
.
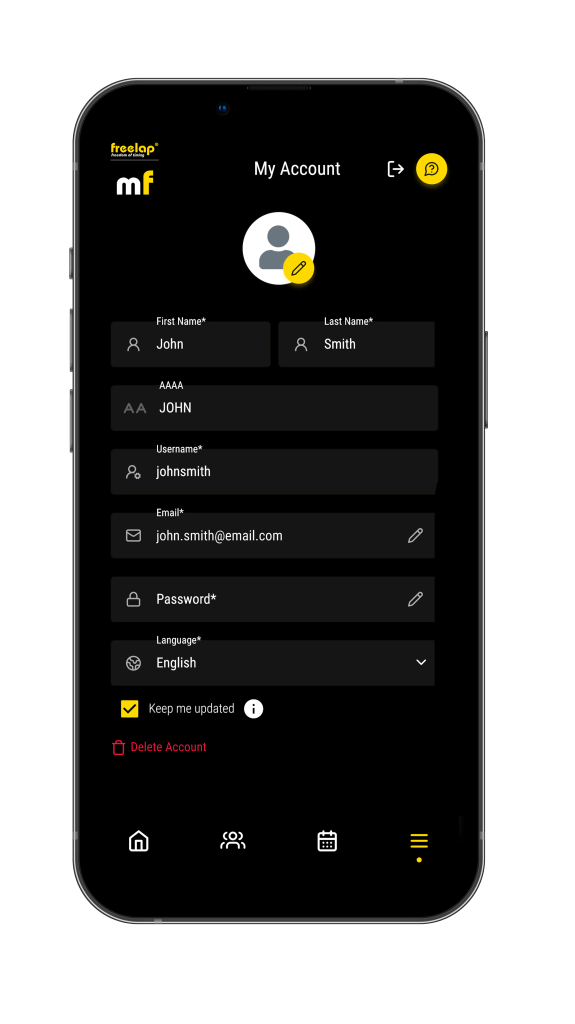
• My Account
From My Account you can :
• Manage your account info
• Change your email address and password
• Delete your MyFreelap account
• Log out
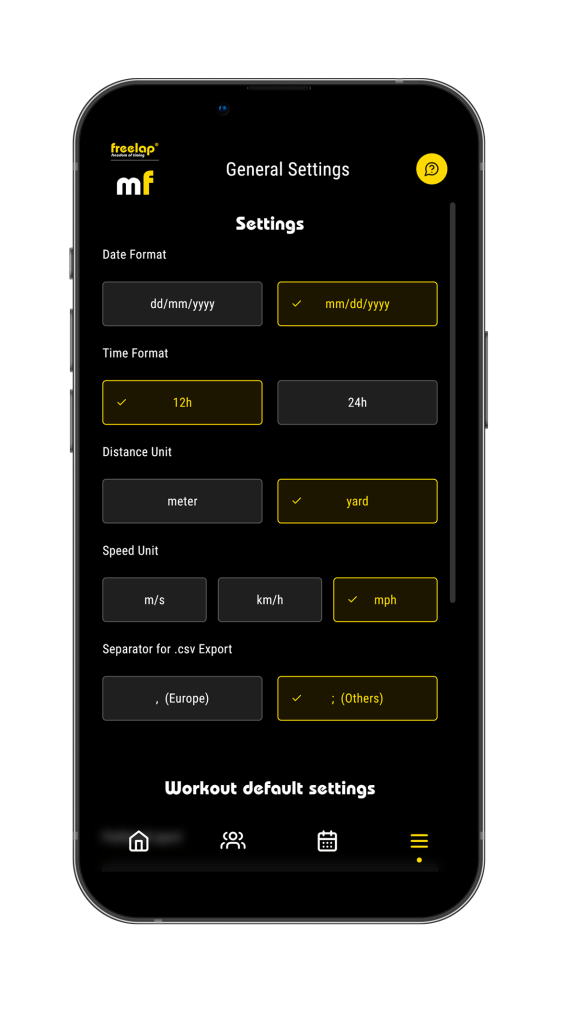
• General Settings
• Settings:
– Choose your Date format
– Choose your Time format
– Choose your Distance Unit
– Choose your Speed Unit
– Choose your separator for csv export
• Set up your Workout default settings:
– Preferred sport
– Freelap BLE device used
– Start list: Solo or Multiple athletes
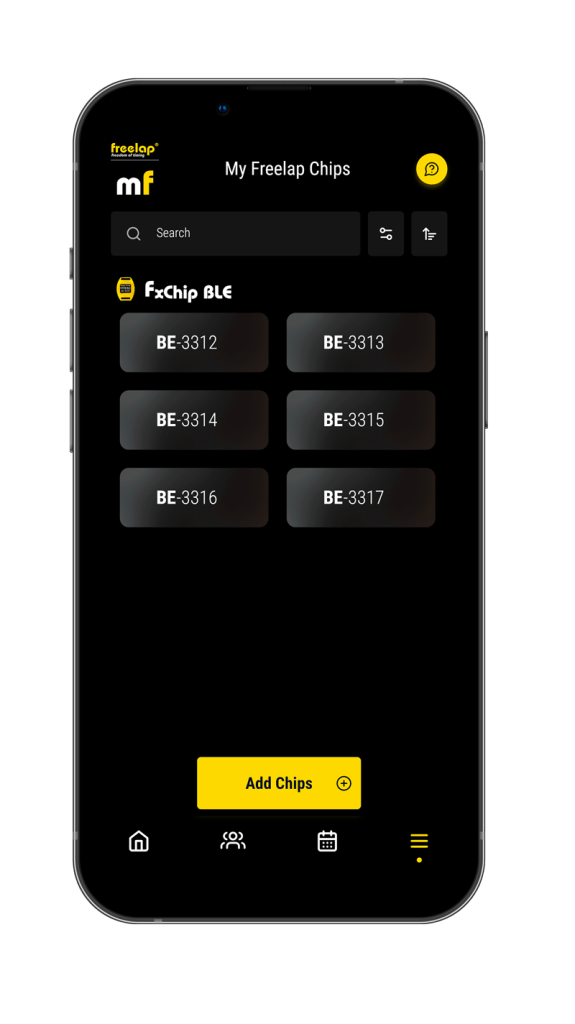
• My Freelap Chips
“My Freelap Chips” section lets you record your Freelap chips to save time.
Each chip has a unique ID: 2 letters – 4 digits written on the front of the device.
Click on the “Add Chips” button. Then you can:
• Add it manually: Enter the ID and click ![]() to add it.
to add it.
• Or Detect via Bluetooth (FxChip BLE only)
• Turn on the Bluetooth on your mobile device.
• Turn on a Freelap transmitter.
• Activate your FxChip BLE transponder(s) putting then into motion, and place them about 30cm from the transmitter. Wait 5 seconds. Make sure that the FxChip BLE still flash (indicating that they are ready to be detected).
• Information
Lets you check the MyFreelap app version you are using.
 TEAMS
TEAMS
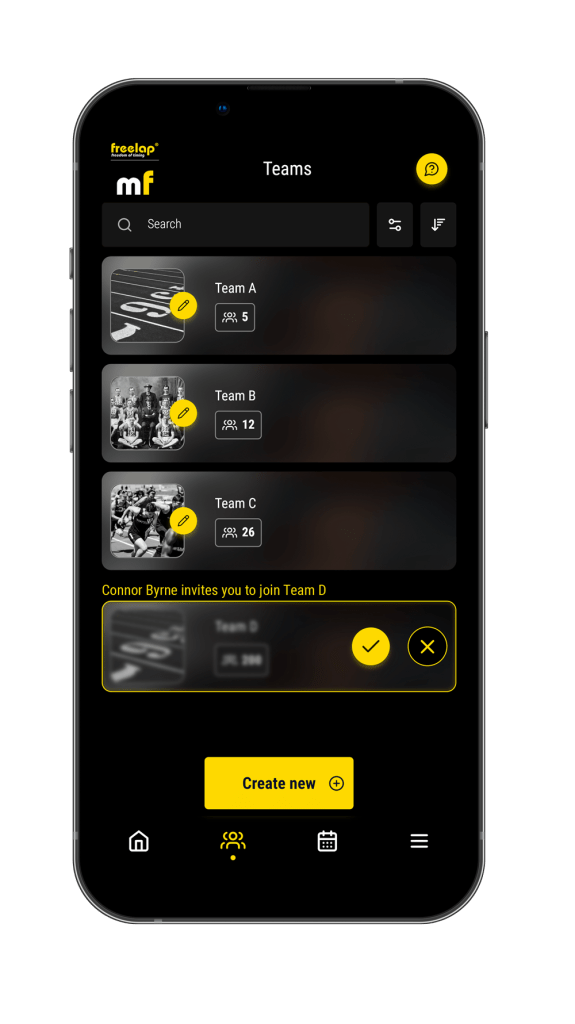
Teams let you create start lists to time several athletes.
From the main bottom menu, click on ![]() .
.
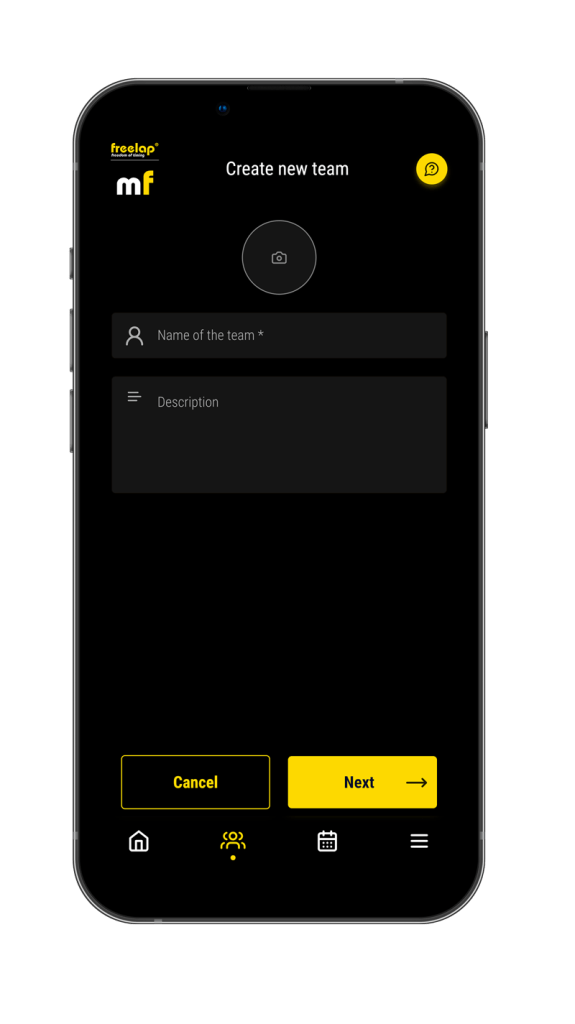
• Create a Team
Click on the “Create new” button to create a new Team.
Then enter :
– The name of the Team (must be unique)
– A description (optional)
– A photo/logo of the Team (optional)
And click on the “Next” button.
Then add members to the Team. MyFreelap offers 3 ways to add members:
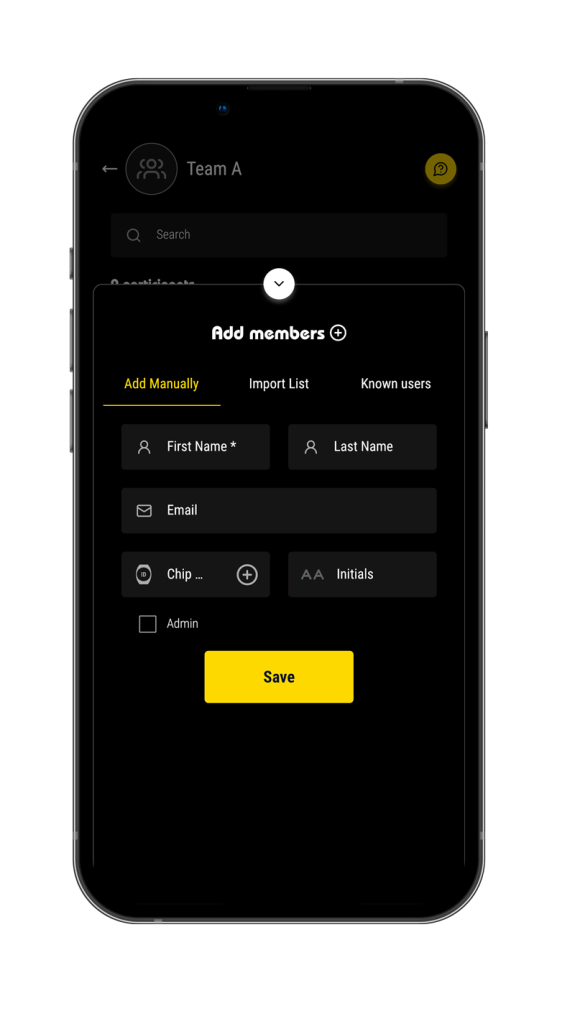
• Add Manually
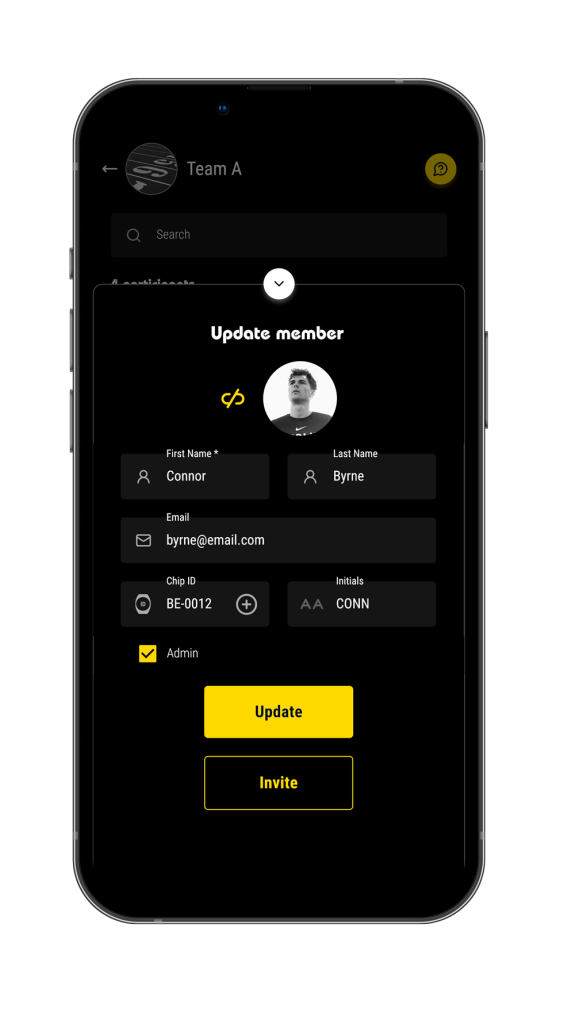
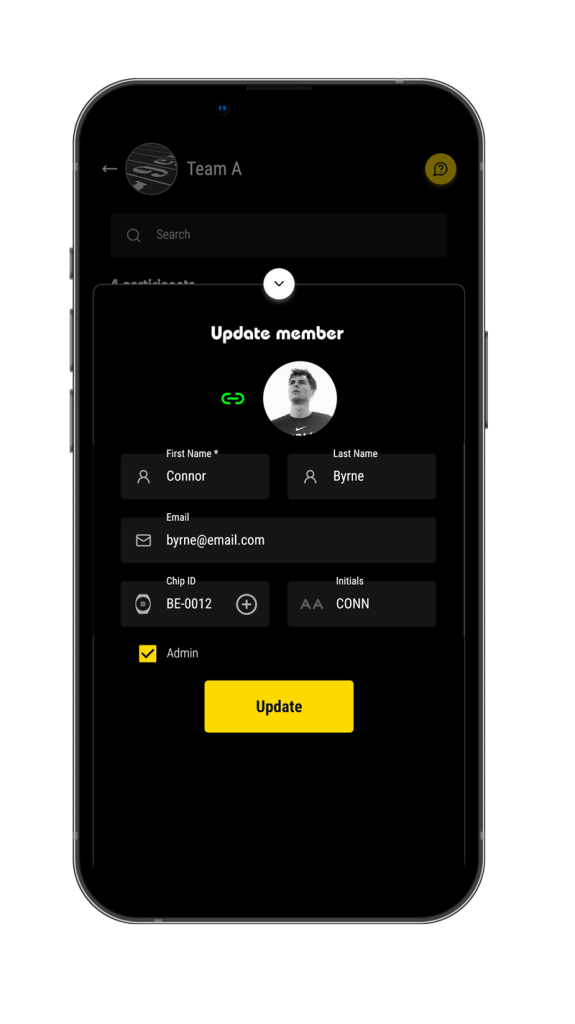
– Enter the First Name (required) of the athlete you want to add to the Team.
The other fields are not required but highly recommended.
– Last Name: Recommended if 2 members have the same First Name.
– Email: Lets the app check if this email is associated to a MyFreelap account. If so, the app will send an invitation to the MyFreelap user, via notification, to join the Team.
– Chip ID: It is the 2 letters – 4 digits written on the front of your device. Assign a unique chip ID to each athlete to save time when creating your Workouts.
– Initials: will be used in the data table, instead of the chip IDs. It will let you easily know at a glance with which athlete the data matches.
– Admin: Check this checkbox if you want to give admin rights on the Team to this member.
– Then click on the “Save” button to add the member.
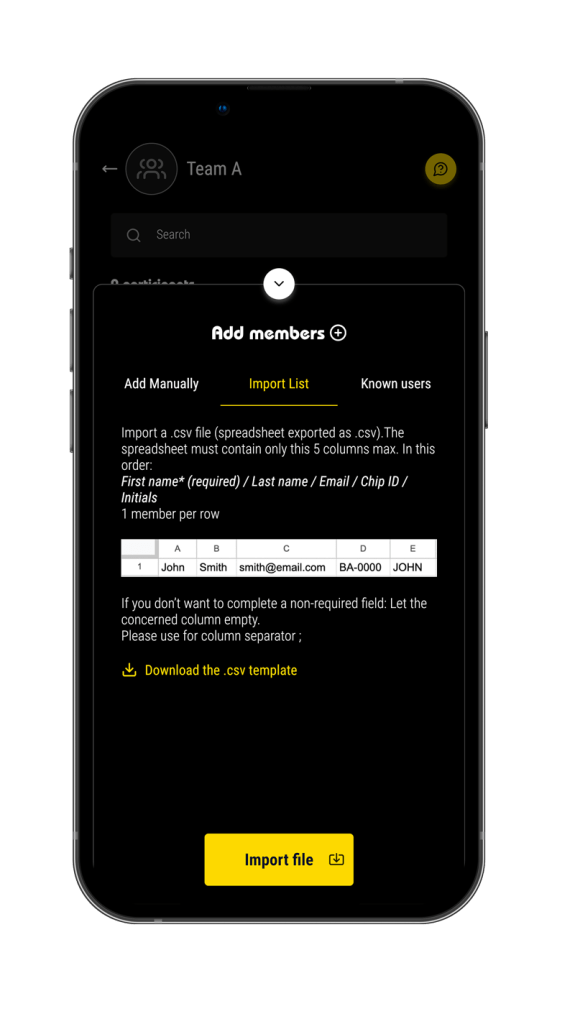
• Import List
Import a .csv file (spreadsheet). The spreadsheet must contain only 1-5 columns: First Name* / Last Name / Email / Chip ID / Initials. 1 member per row. Max. 500 athletes in a Team.
To download the spreadsheet template, click on “Download the .csv template“.
If you don’t want to complete a non-required field: Let the concerned column empty.
Please use “;” for column separator.
Click on “Import file”, select your file, and click on “Import”.
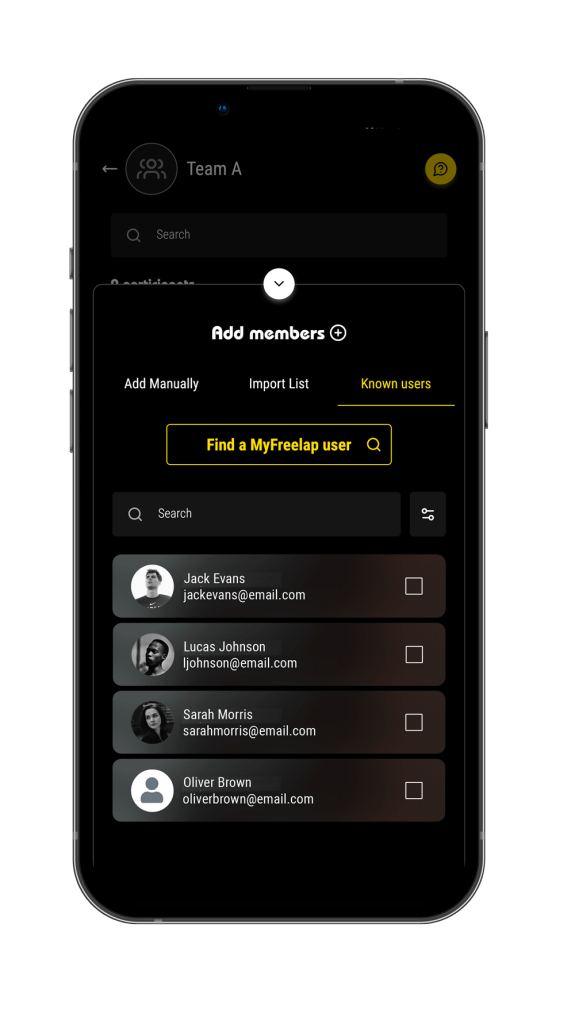
• From Known Users
It lets you quickly add a member from the list of the MyFreelap users you already interacted with; or to search for another MyFreelap user to add him into the Team.
Select the MyFreelap user you want to add to the Team, and click on “Add selected user(s)”.
To search for another MyFreelap user who is not already in your list, click on “Find a MyFreelap user“. Then enter his email and click on “Search”. Then click on “add” to add him into your list of known users, check his checkbox, and click on “Add selected user(s)”
The app will send an invitation to the MyFreelap user, via notification, to join the Team.
• About Team invitations
When an email his entered for a Team member, the app checks if this email is associated to a MyFreelap account. If so, the app sends an invitation to the MyFreelap user, via notification, to join the Team. The user can accept or reject the invitation.
– If the user accepts: He will see the Team on his account. He will only be able to see the Team and the list of the members, and quit the Team.
He won’t be able to edit, delete or use the Team if he doesn’t have admin rights. If you want to give him admin rights, click on this member to update it, and check the “Admin” checkbox.
-If the user rejects : He won’t see the Team on his account but you can still do Workouts with this member. He just won’t be connected to the Team.
Note: To cancel or resend an invitation to a user, click on the concerned user on the member list.
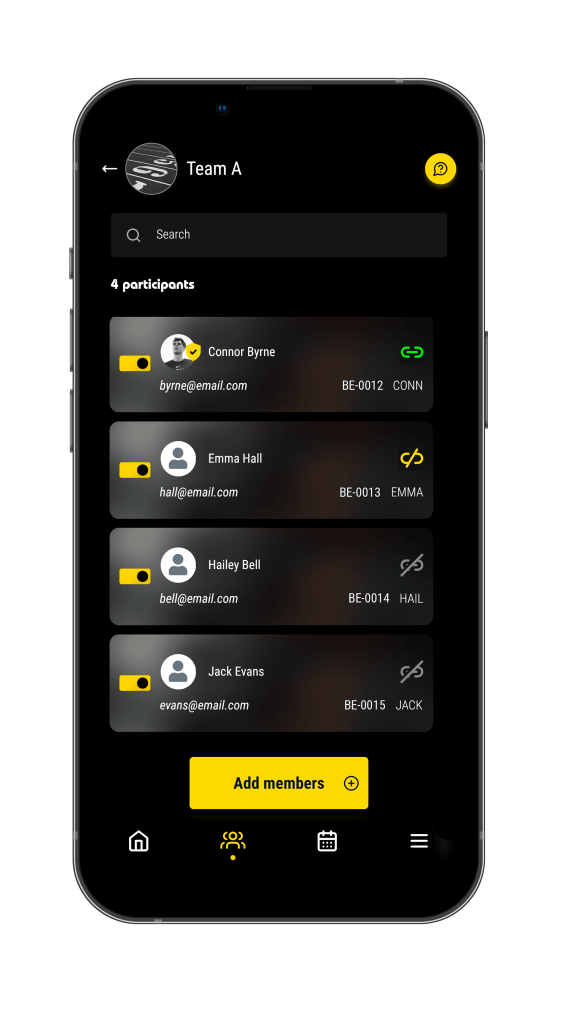
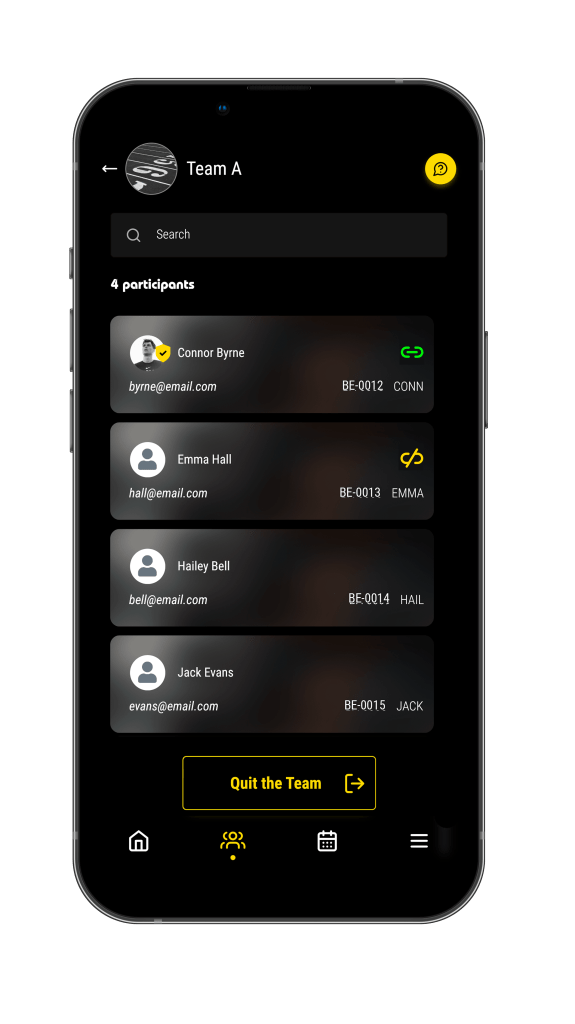
Then, in your Team, each member has a status icon:
![]() = User doesn’t have a MyFreelap account (or no Email entered)
= User doesn’t have a MyFreelap account (or no Email entered)
![]() = User has a MyFreelap account, but he has rejected your invitation to connect.
= User has a MyFreelap account, but he has rejected your invitation to connect.
![]() = User has a MyFreelap account, but he has not accepted your invitation yet.
= User has a MyFreelap account, but he has not accepted your invitation yet.
![]() = User is part of your Team. He can see the Team on his account.
= User is part of your Team. He can see the Team on his account.
![]() = User is admin of the Team. The MyFreelap users which have admin rights on a Team can:
= User is admin of the Team. The MyFreelap users which have admin rights on a Team can:
– Use, edit, and delete the Team
– Add, edit, and delete Team members
– Give / remove admin rights
Moreover, the Workouts done using a Team are automatically shared to all the admins of the Team. You can have several admins for the same Team.
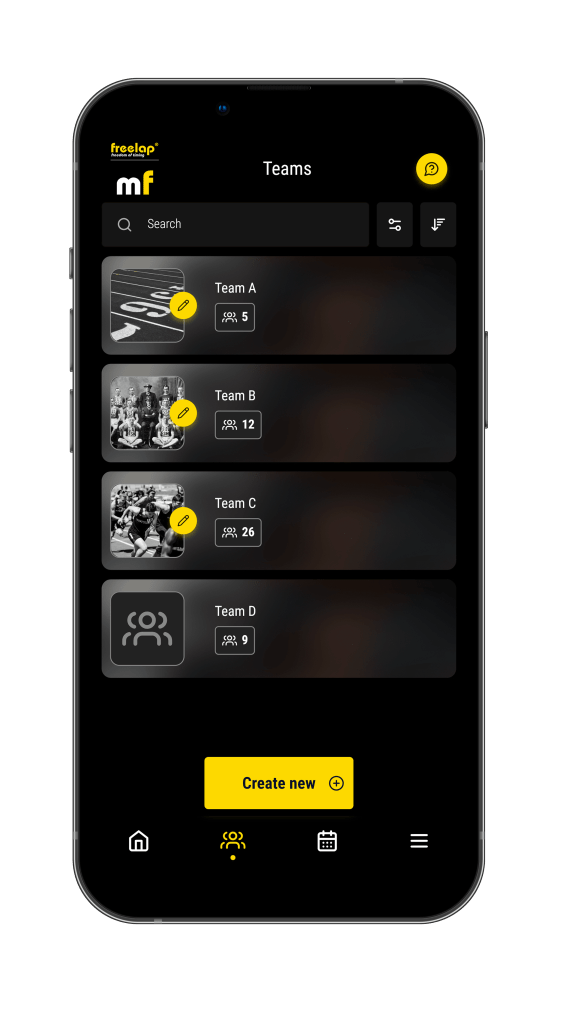
• Manage & Use Teams
Teams screen displays the list of your Teams.
From this screen you can:
– Click on ![]() to edit Team info (name, description and image) / Only available if you are admin of the Team.
to edit Team info (name, description and image) / Only available if you are admin of the Team.
– Make a long press on a Team to delete it.
– Click on a Team to enter it.
The screen displays the Team info and the list of the members.
• If you are admin of the Team, you can:
– Add Member(s) to the Team > Click “Add Members”
– Search a member using the search bar
– Click on a member to edit its info (First name / Last Name / Email / Chip ID / Initials / Admin rights / cancel or resend invitation)
– Turn OFF the members you want to remove from the Start list, using the switchers ![]()
– Press 3s to delete a member
• If you are NOT admin of the Team, you can only:
– View the list of the Team members
– Quit the Team
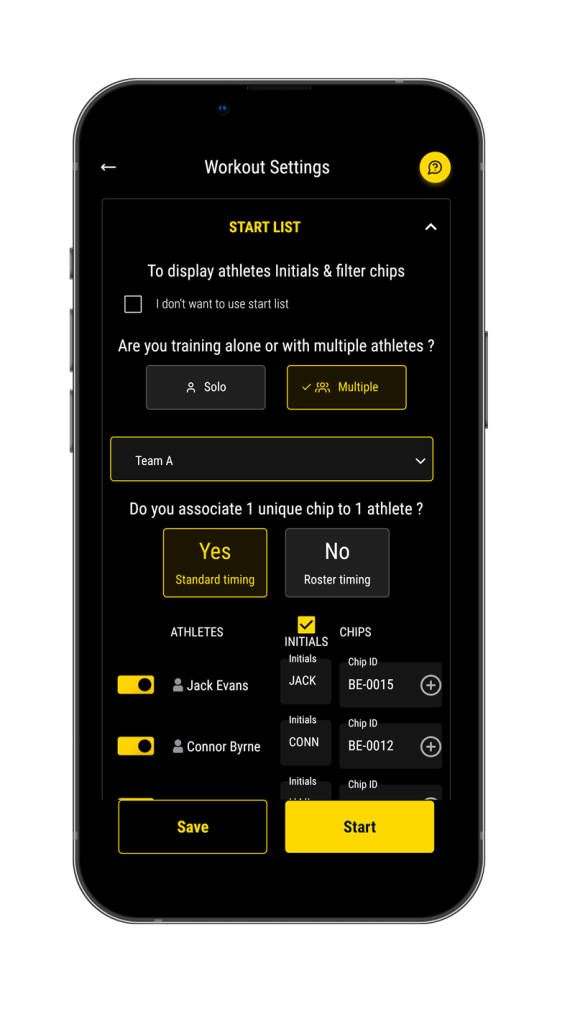
Once you are creating your Workout, on the Start list section: Choose “Multiple” and select your Team in the list.
 START TIMING
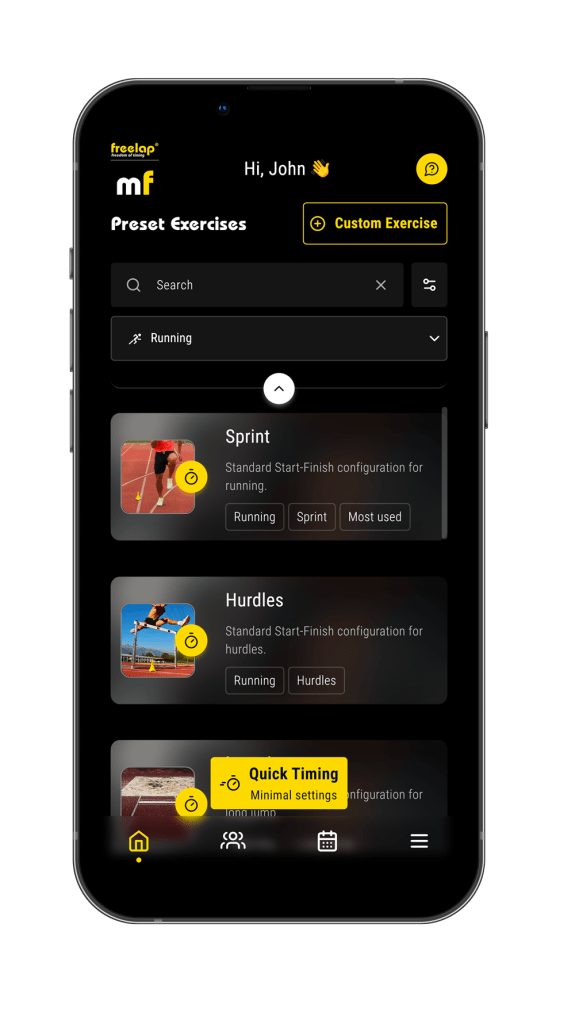
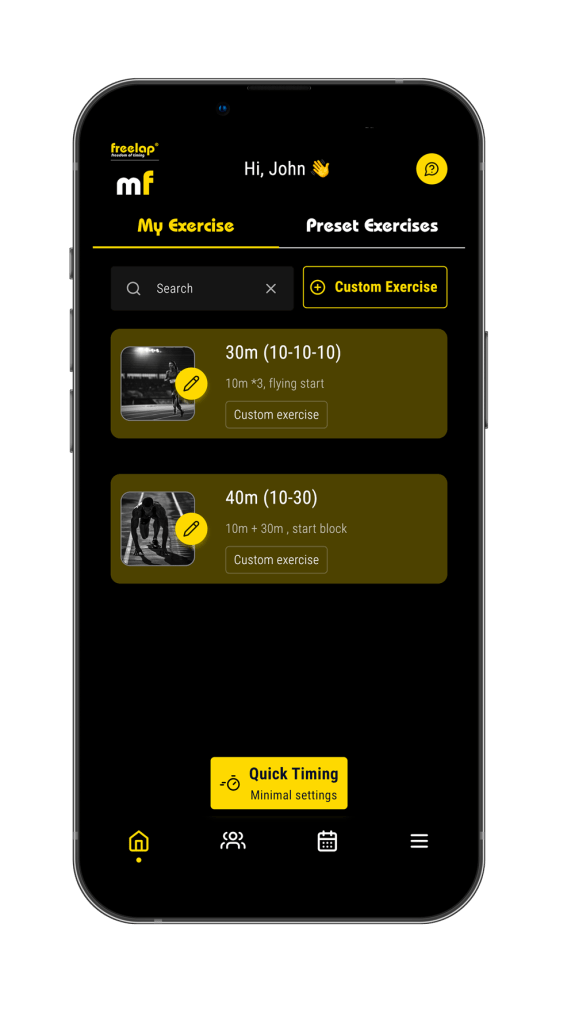
You can start timing using the Quick Timing, or using an Exercise. The Quick Timing button, the library of preset Exercises and the button to create a custom Exercise, are available from the Dashboard. From the main bottom menu, click on ![]() .
.
 QUICK TIMING
The Quick Timing button lets you start timing quickly with minimal setup and features.
From the Dashboard, click on “Quick Timing”.
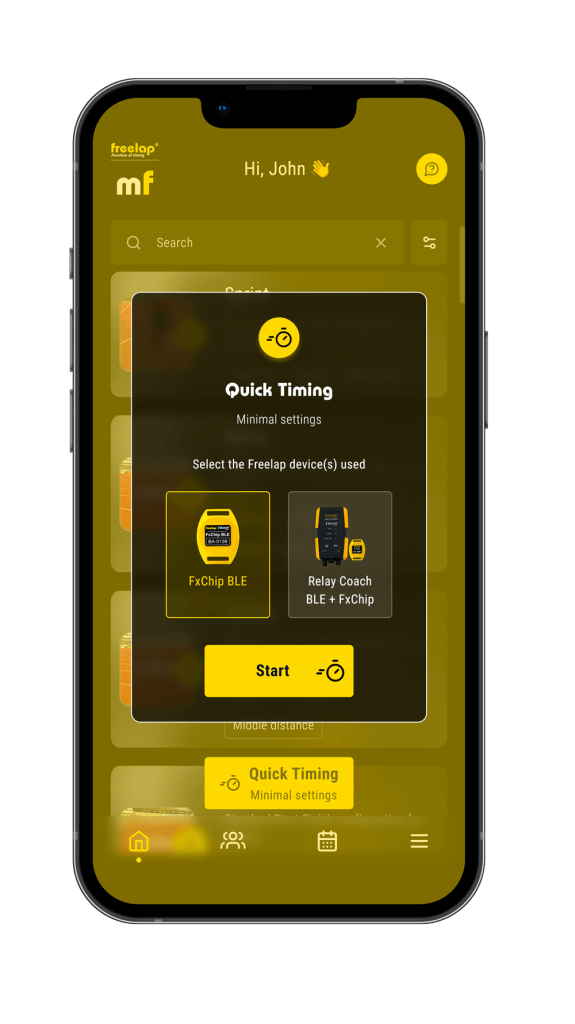
• Select the type of Freelap BLE device you use between “FxChip BLE” or “Relay Coach BLE + FxChip”
• Click on Start
![]() Using the Quick Timing you can access only the minimal features.
Using the Quick Timing you can access only the minimal features.
Features NOT available using Quick Timing:
– Set up a start List to be able to:
– Display athletes’s Initial or First Name
– Receive only the data of the selected chips (and not all chips around you)
– Select Roster timing method
– Set Distances and get Speed data
If you want to access all the features, select a preset Exercise.
 EXERCISES
The Exercises let you start timing easily with full features, according to the need of the Exercise. You can either use a preset Exercise (coming with detailed tutorials) or create and use your own Exercise.
The Exercises are accessible from the Dashboard. From the main bottom menu, click on ![]() .
.
Step 1: Select an Exercise
A / PRESET EXERCISE
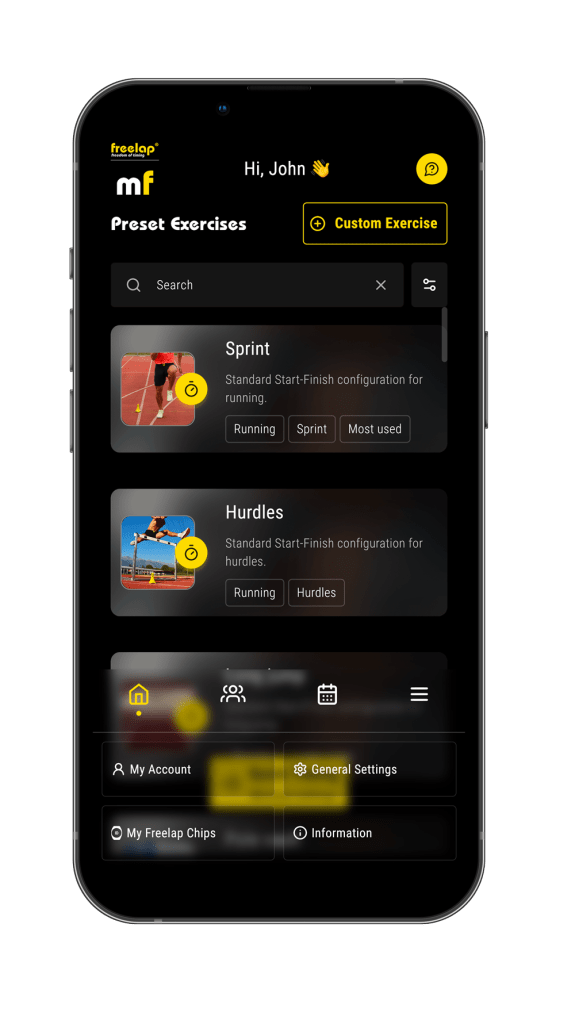
• Find the preset Exercise which meets your needs
To find the good Exercise for you, you can:
– Search using the Search bar
– Filter the Exercises by sport
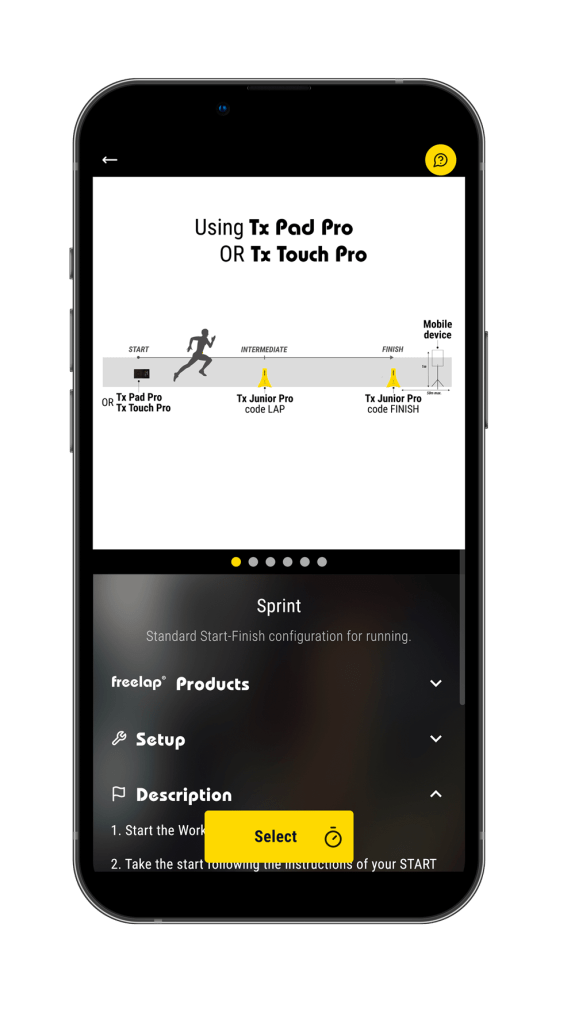
• Use a preset Exercise
– Click on an Exercise to enter it.
You will be able to see:
• Examples of configurations
• The list of the Freelap products needed
• A step by step setup tutorial
• A step by step tutorial about how to run the Exercise.
• Click on the button “Select” to select the Exercise.
B / CUSTOM EXERCISE
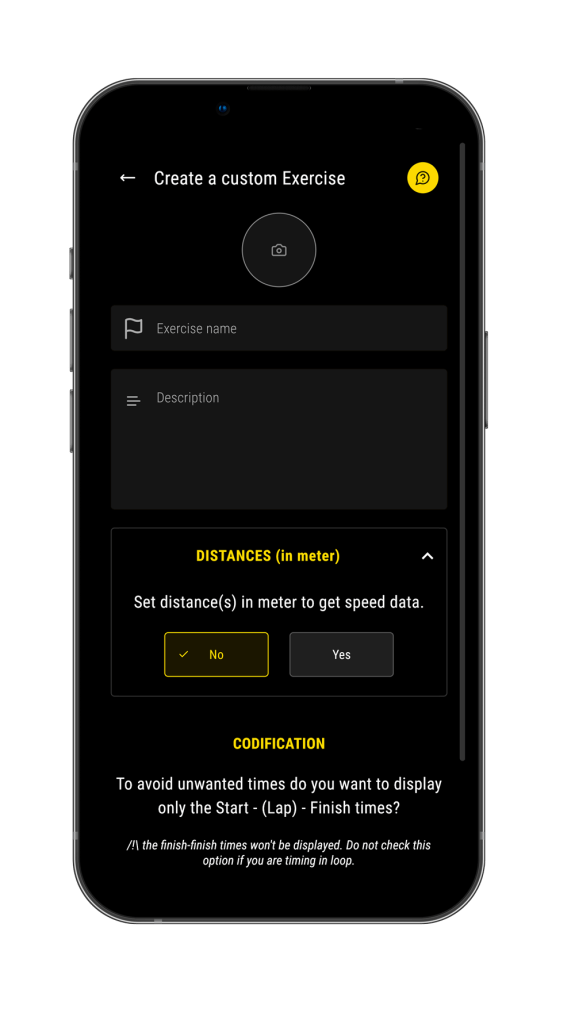
• Create a custom Exercise
– Click on the “+ Custom Exercise” button
– You can add the image of the Exercise (optional)
– Enter the Exercise name
– Enter a Description of the Exercise (optional)
– In the DISTANCES section you can add the distances between each transmitters to get distances and speed data. (optional)
– Then in the CODIFICATION section you can choose to display only START-(LAP)-FINISH times to avoid unwanted times. (do not check this option if you are timing in loop (FINISH-FINISH) times. (optional)
– Click on save to save your Exercise.
• Manage and use a Custom Exercise
– Click on ![]() to edit a custom exercise. /!\ You won’t be able to edit the distance.
to edit a custom exercise. /!\ You won’t be able to edit the distance.
– Make a long press on a Custom Exercise to delete it.
– Click on a Custom Exercise to select it to start timing.
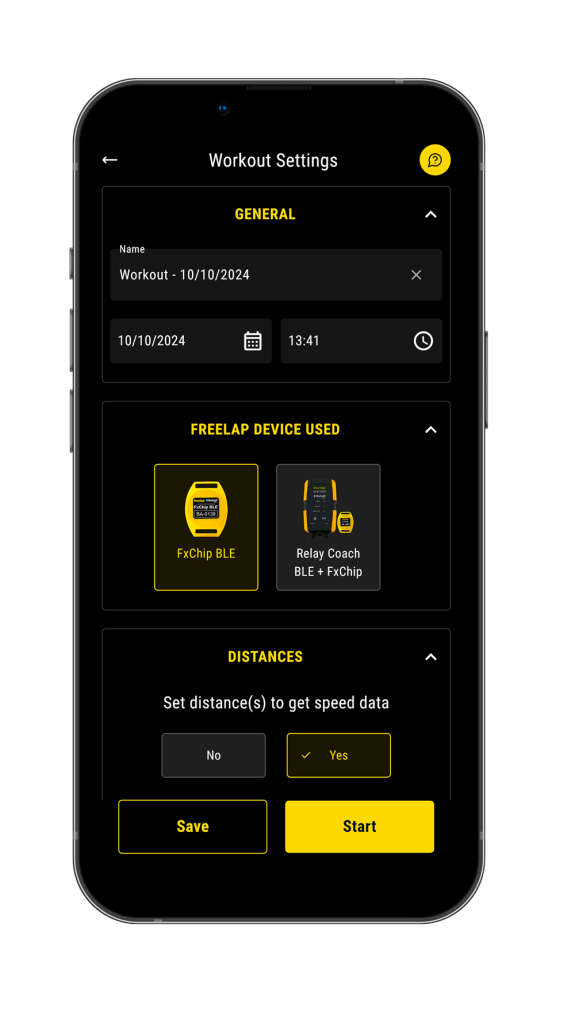
Step 2: Set up your Workout
• General Settings:
– Change the name of the Workout
– Change the date and time of the Workout
• Freelap device used:
– Select the type of Freelap BLE device you are using
• Distances:
The Distance section won’t be displayed if you use a Custom Exercise (because it is already specified in the Custom Exercise itself).
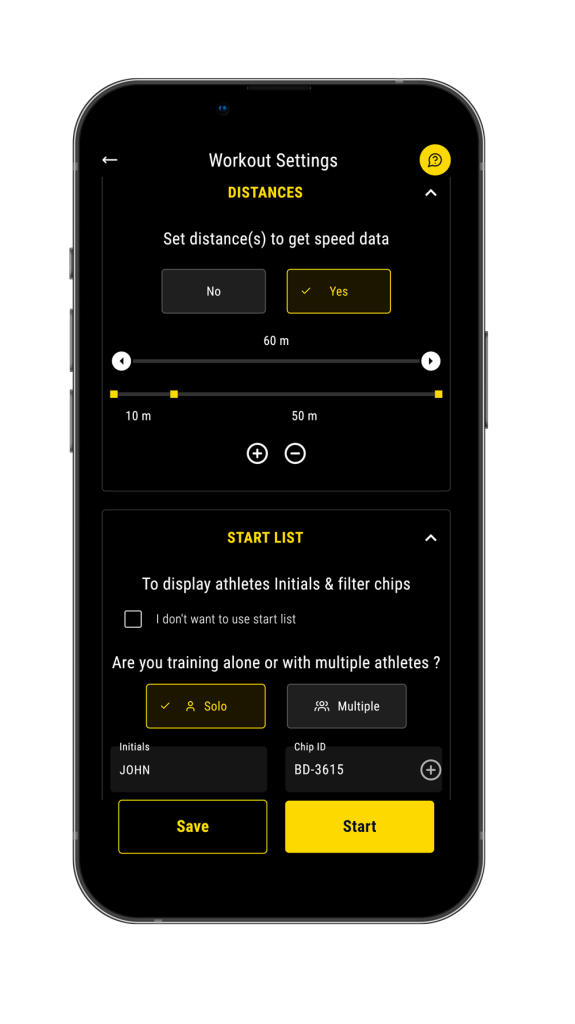
Add Distance(s) to get your distance and Speed data !
![]()
– If you have at least 1 LAP transmitter you must add the distance between each transmitters. Example: To time 60m with a LAP transmitter at 10m ( so 10m + 50m): Add a distance “10” > then click on the + button to add the 2nd distance “50”.
– The distances are always in meters.
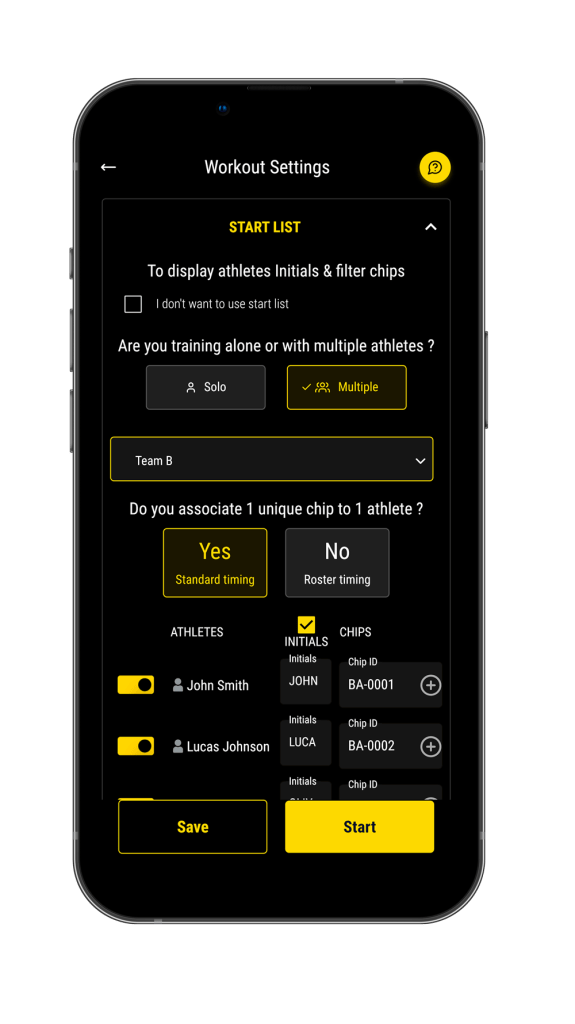
• Start List:
– If you don’t want to use a start list check the “I don’t want to use start list” checkbox.
Or choose between:
– Enter the athlete initials (max. 4 characters) (optional): Initials will be displayed in the data table instead of the Chip ID.
– Enter the chip ID (2 letters – 4 digits written on the front of your device), or select it in the dropdown list.
– Select a Team in the dropdown list of your Teams
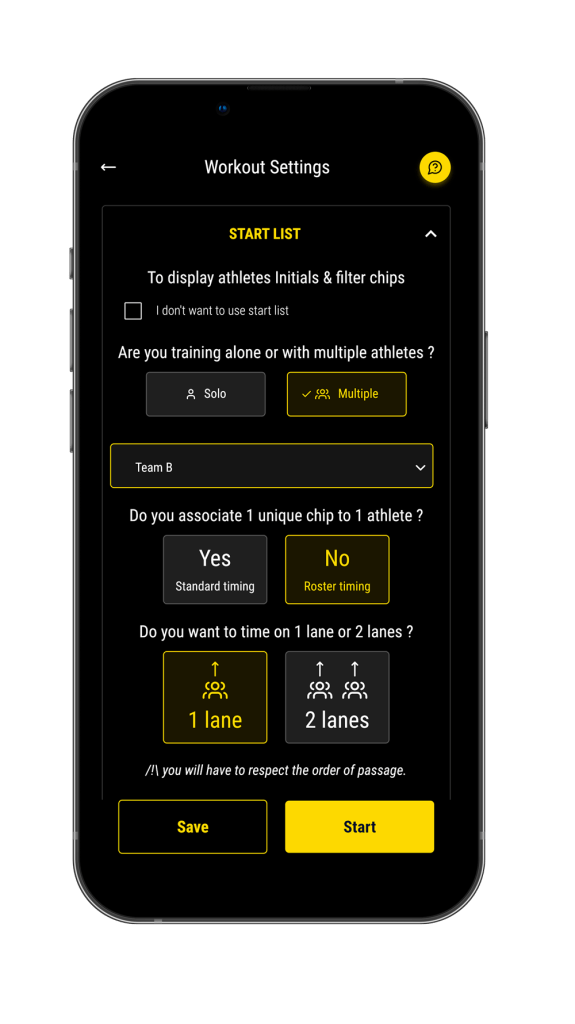
– Choose between Standard timing or Roster timing
– Manage your start list
Click on “Start” to Start the Workout, or on “Save” to start it later.
> If you selected “Relay Coach BLE”: the app will search and display the list of the Relay Coach BLE around you.
– Turn on your Relay Coach BLE.
– Click on the Relay Coach BLE you are using to select it and start receiving data.
![]() What is the difference between Standard timing and Roster timing ?
What is the difference between Standard timing and Roster timing ?
– Standard timing (the most used): 1 athlete = 1 chip. The data is associated to the athlete with the chip ID. Each Freelap chips have a unique ID that let’s you time several athletes simultaneously, even on different tracks / exercises.
– Roster timing (mostly used by big teams training in a row respecting an order of passage): With Roster timing, you don’t need to assign a unique chip to a unique athlete. Athletes can lend the chips to each other. Times are assigned to the corresponding athlete following the order of passage of the start list.
Step 3: Manage your Start list
– Click on ![]() to turn OFF the missing athletes
to turn OFF the missing athletes
– Enter/edit Initials (max. 4 characters): Initials will be displayed in the data table instead of the Chip ID. Uncheck Initials checkbox if you don’t want to use it.
– Assign a unique chip to each athlete. Select a chip from the list of the chips you entered in your “My Freelap Chips” section, or manually enter the chip ID (2 letters – 4 digits written on the front of your device), or detect via Bluetooth.
Edit the chips assigned to the Workout:
– Click on ![]() to turn OFF the chips you won’t use
to turn OFF the chips you won’t use
Edit your Start List:
– Click on ![]() to turn OFF the missing athletes
to turn OFF the missing athletes
– Click on ![]() to drag and drop athletes to change the order of passage.
to drag and drop athletes to change the order of passage.
![]() Athletes will have to respect the order of passage during the Workout.
Athletes will have to respect the order of passage during the Workout.
Edit the chips assigned to each lane:
– Click on ![]() to turn OFF the chips you won’t use
to turn OFF the chips you won’t use
– Click on ![]() to drag and drop chips to change the lane they are assigned to.
to drag and drop chips to change the lane they are assigned to.
![]() The assignment of each chip to each lane will imperatively have to be respected.
The assignment of each chip to each lane will imperatively have to be respected.
Edit your Start List:
– Click on ![]() to turn OFF the missing athletes
to turn OFF the missing athletes
– Click on ![]() to drag and drop athletes to switch them to the other lane / to change the order of passage.
to drag and drop athletes to switch them to the other lane / to change the order of passage.
![]() Athletes will have to respect their lane and order of passage during the Workout.
Athletes will have to respect their lane and order of passage during the Workout.
![]() The Workout settings can vary depending on the Exercises:
The Workout settings can vary depending on the Exercises:
– For some Exercises Distance section is not available because, distance is not useful or because a preset distance is already set and can’t be changed.
– For some Exercises, Roster timing method is not available because not used.
Click on “Start” to Start the Workout, or on “Save” to start it later.
![]() You can only start a Workout (reception of the data) from the MyFreelap application, and not for the web myfreelap.com version.
You can only start a Workout (reception of the data) from the MyFreelap application, and not for the web myfreelap.com version.
From the web you can only Save the Workout to be able to start it from your mobile device.
 LIVE: RECEIVE DATA
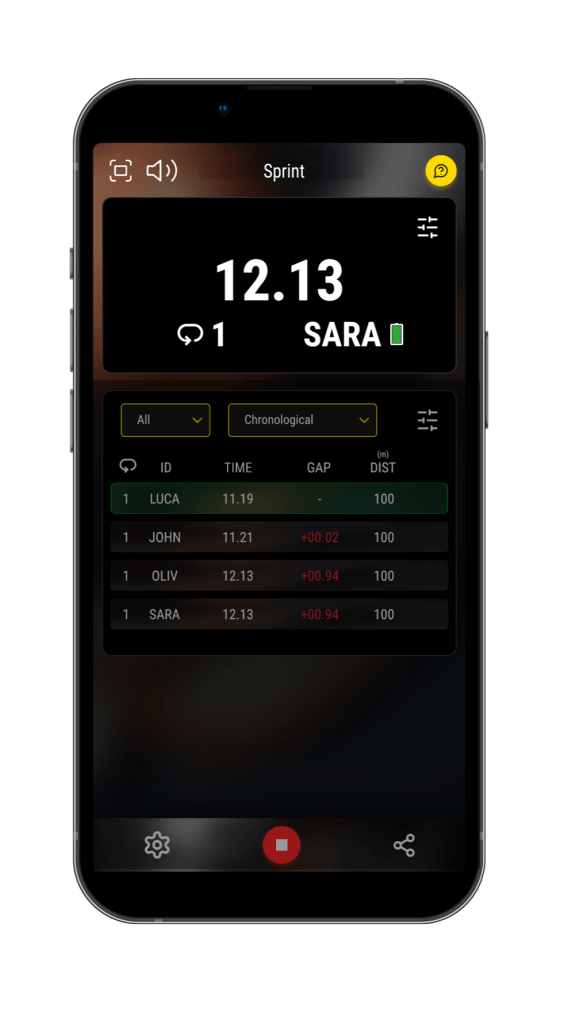
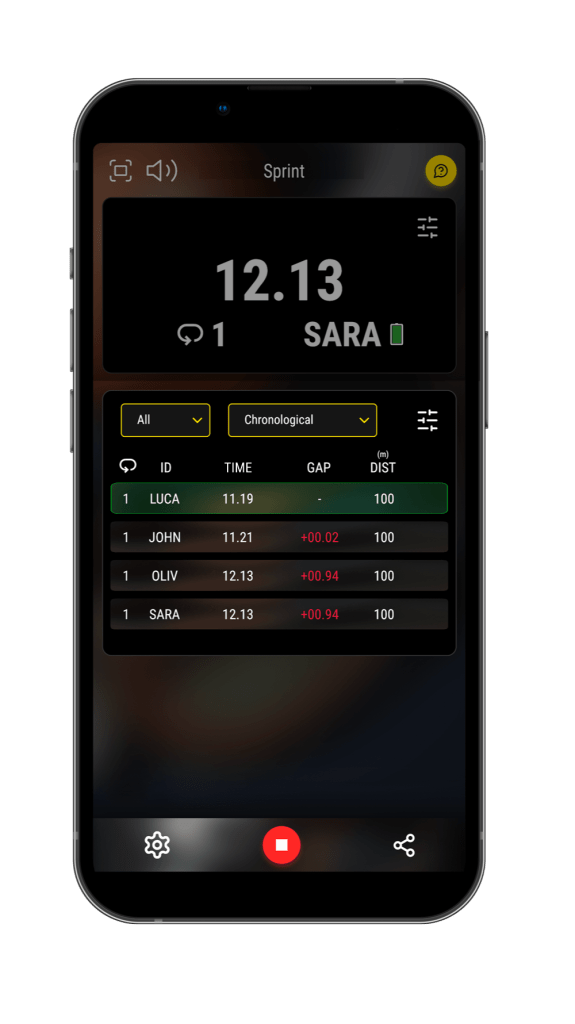
The LIVE screen is when you start your Workout to receive your data.
• Open the Workout you want to start.
• To start receiving timing data: click ![]() at the bottom.
at the bottom.
.
“Live” mode is only available from the MyFreelap app.
• Attach the chips on the athletes.
• Turn on and place your Freelap transmitters. You must have 1 transmitter set on the code FINISH.
• Place your mobile device at least 1m off the ground. Depending on your mobile device, you will be able to stand between 10 and 50 meters (for the most recent devices) away from the finish line. (If the athlete is using a smartwatch or is keeping his smartphone in his pocket: it’s ok).
• If you have a Relay Coach BLE: turn it on and place it after the FINISH transmitter at 10m.
To learn more about setting up your Freelap devices, please refer to our Guides by sport.
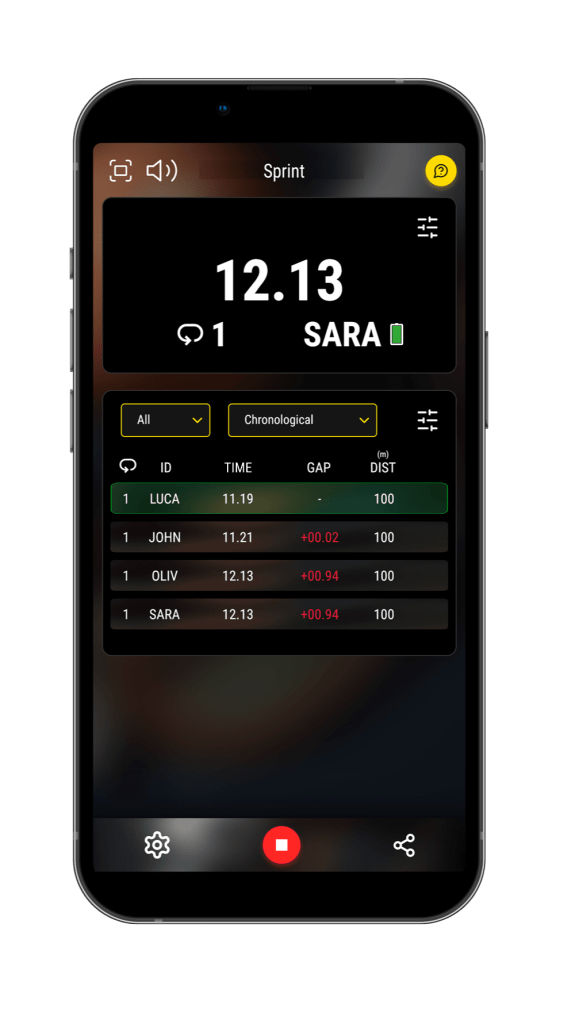
• General
At the top is written the name of the Exercise you are timing.
• ![]() : Open Fullscreen mode
: Open Fullscreen mode
• ![]() : Turn ON/OFF sound
: Turn ON/OFF sound
• ![]() : Modify Workout settings
: Modify Workout settings
• ![]() : Share / Export Workout data
: Share / Export Workout data
• ![]() : Stop recording data
: Stop recording data
• Last time received
In the top part of the screen is displayed the data of the last time received.
In other words, every time an athlete crosses the Finish line, his data is displayed at the top of the screen. The data remains displayed until a new time is received and displayed.
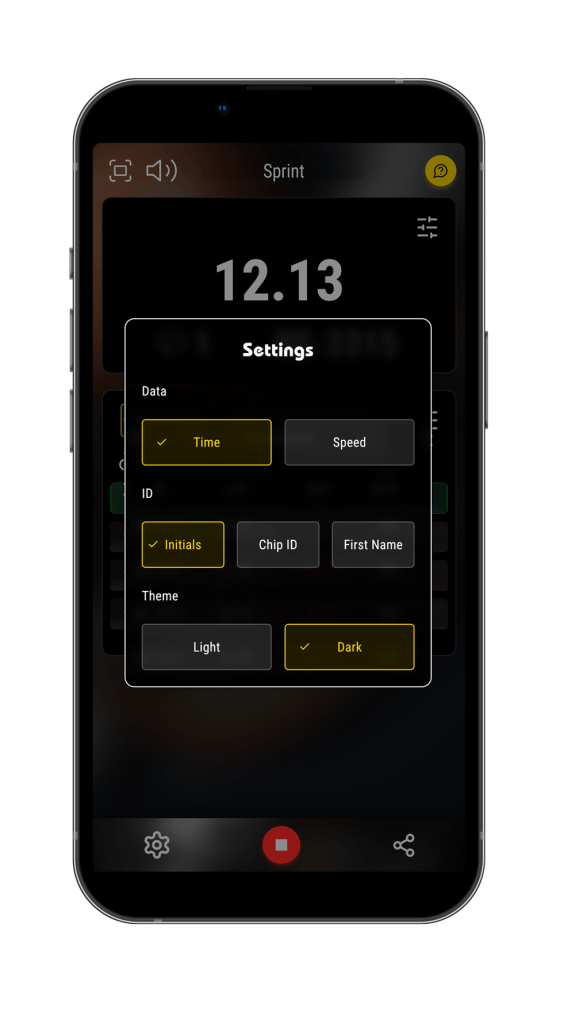
• By clicking ![]() you can customize the display and choose between displaying:
you can customize the display and choose between displaying:
– Data: Time OR Speed
– ID: Initials OR Chip ID OR First name
– Theme: Light OR Dark
• Data table
The table displays all the data received.
• Filter: By default the table displays the data of all athletes, but you can choose to filter the data table to display the results of only 1 athlete.
• Sort: By default the data are sorted in Chronological order, but you can change for Antechronological or Ranking order (from the best time to the slowest time).
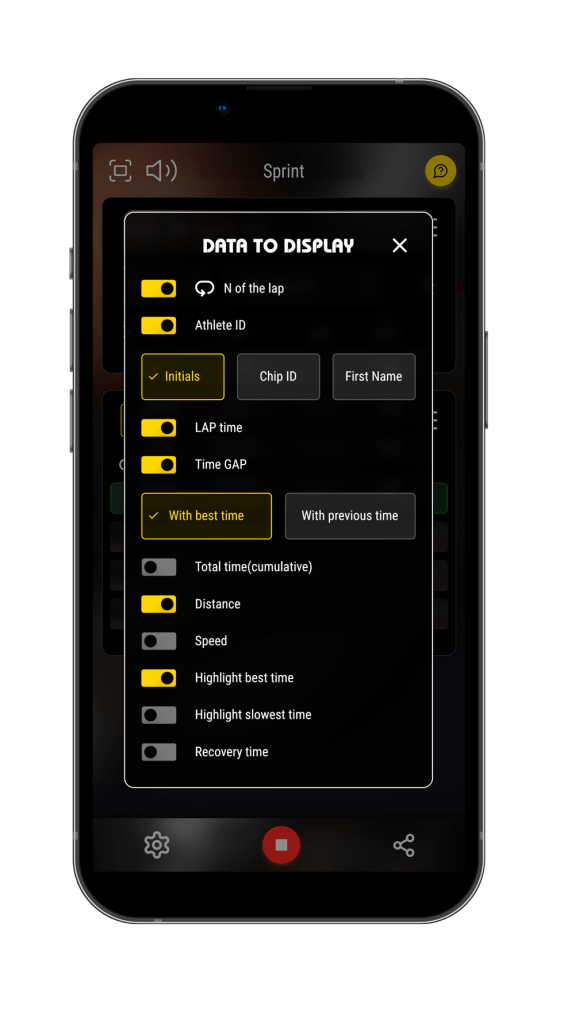
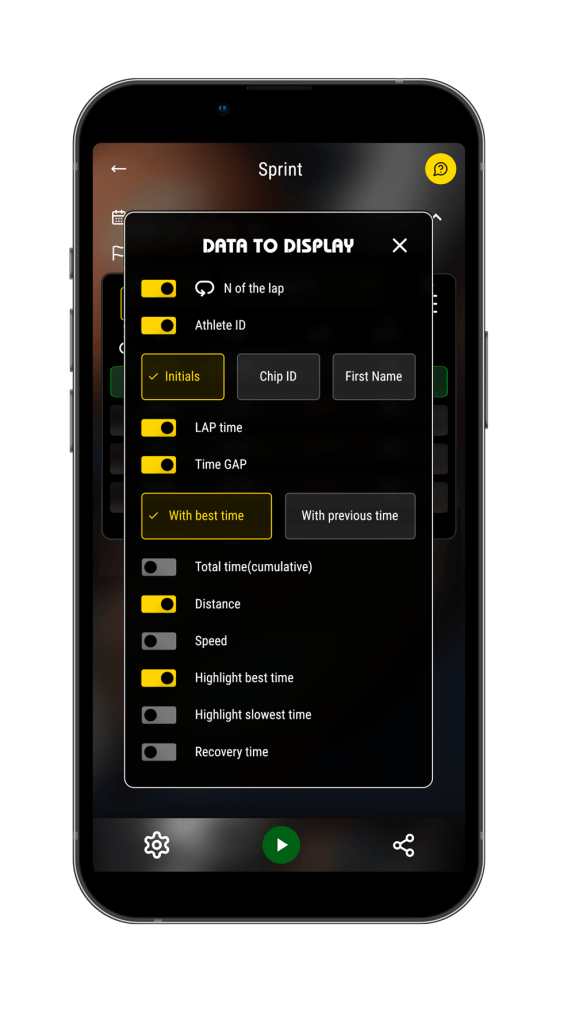
• Customize the data to display: Click on ![]() to open the customization pop up. Then you can turn ON/OFF the type of data you want to display/hide using the switchers
to open the customization pop up. Then you can turn ON/OFF the type of data you want to display/hide using the switchers ![]() .
.
Note: Depending on the Exercises or on your Workout settings, some types of data can be unavailable.
• Press 3 seconds on a time to delete it. You can select several times:
– Click on “Delete selected” to delete the selected times.
– Click on “Delete all data” to delete all the data of the Workout.
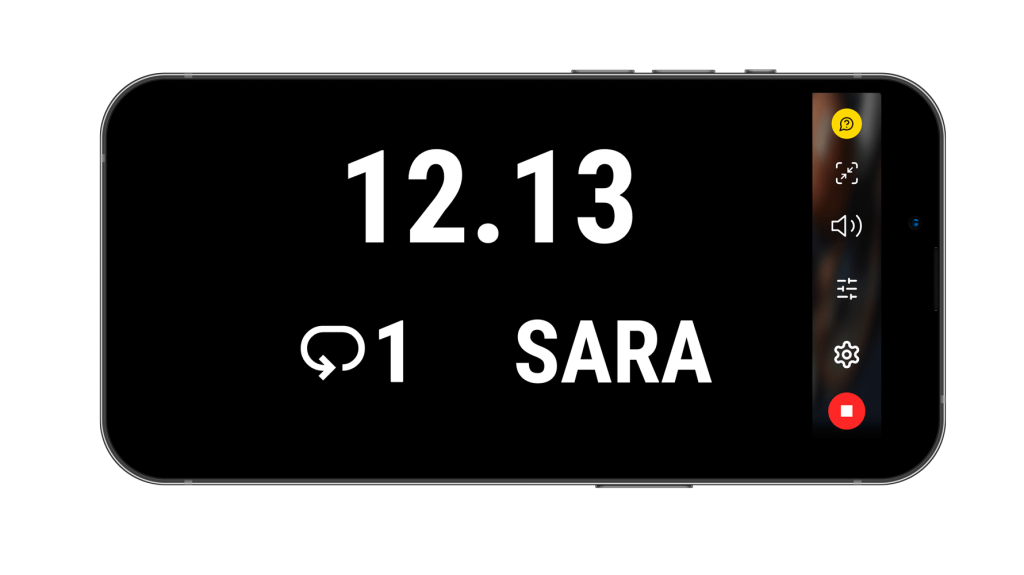
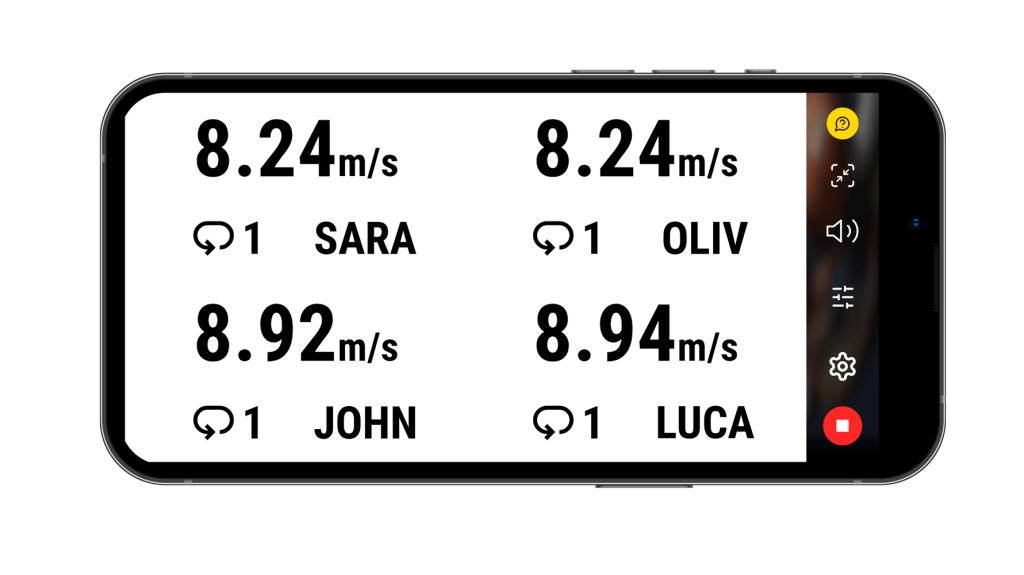
• Fullscreen mode
• Click on ![]() to open the fullscreen mode
to open the fullscreen mode
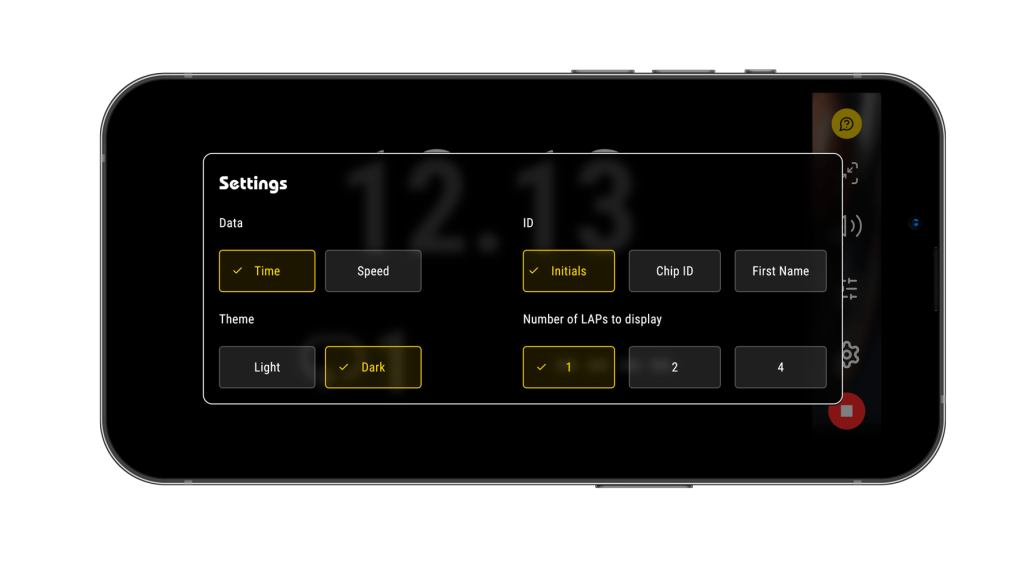
• By clicking ![]() you can customize the display and choose between displaying:
you can customize the display and choose between displaying:
– Data: Time OR Speed
– ID: Initials OR Chip ID OR First name
– Theme: Light OR Dark
– Number of times to display: 1, 2 OR 4
• Click on ![]() to exit the fullscreen mode.
to exit the fullscreen mode.
![]() Types of data:
Types of data:
• ![]() : Number of the lap of the athlete (1,2,3 ..)
: Number of the lap of the athlete (1,2,3 ..)
• ID: Chip ID / or Initials / or First Name of the athlete
• TIME: lap time (the number of intermediate times of the lap is indicated in parenthesis) + Click on a time to see the details of the intermediate times
• GAP: Time gap (with the previous time of the same athlete OR with the best time of all the Workout)
• TOTAL: Total cumulative time of the laps of the athlete
• DISTANCE: Distance of the lap
• SPEED: Average speed of the lap. Can be set on m/s, km/h or mph.
• BEST TIME: Highlighted with a green background
• SLOWEST TIME: Highlighted with a red background
 HISTORY
The History is the place where are stored all your Workouts.
From the bottom menu, click on ![]() .
.
.
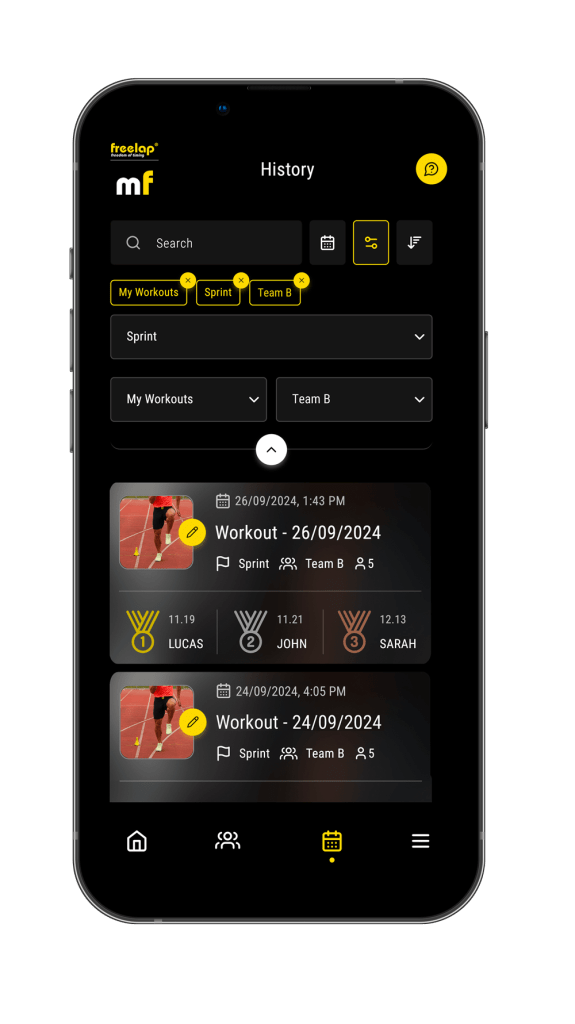
From the History you can:
![]() : Search a Workout using the search bar.
: Search a Workout using the search bar.
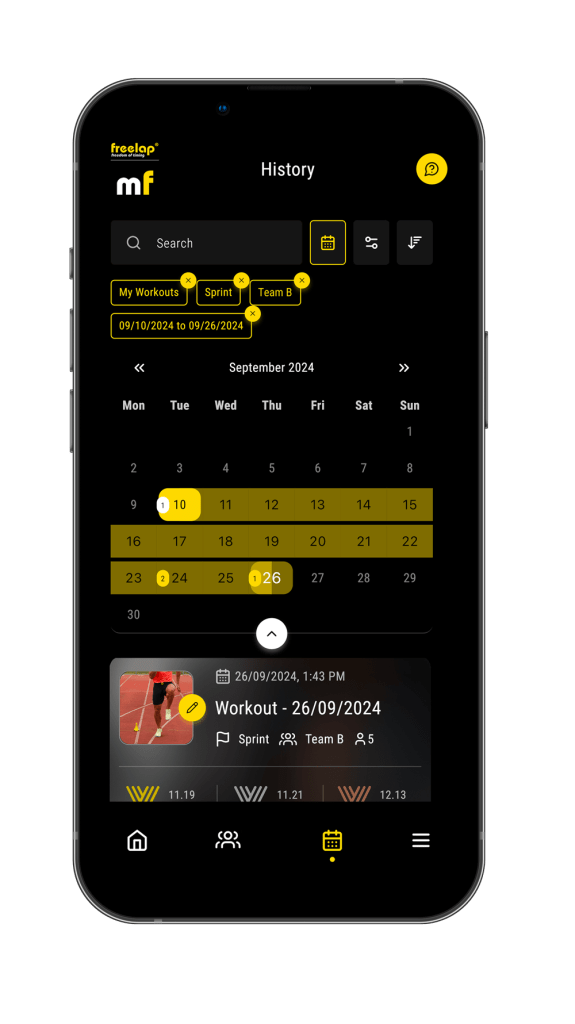
![]() : Use the calendar view. The dates on which a Workout was performed or planned are marked with a yellow sticker indicating the number of workouts done/planned for this date.
: Use the calendar view. The dates on which a Workout was performed or planned are marked with a yellow sticker indicating the number of workouts done/planned for this date.
Click on a date to see the list of the Workouts performed / planned for this day.
You can select a period: click on the start date and on the end date of the period you want to select.
![]() – Filter the Workouts:
– Filter the Workouts:
– By Exercise
– By Type: My Workouts / Shared Workouts (Workouts that have been shared to you by another MyFreelap user)
– By Team
![]() Sort the Workouts by:
Sort the Workouts by:
– Chronological order
– Antechronological order
• Press 3 seconds on a Workout to delete it. You can select multiple Workouts to delete.
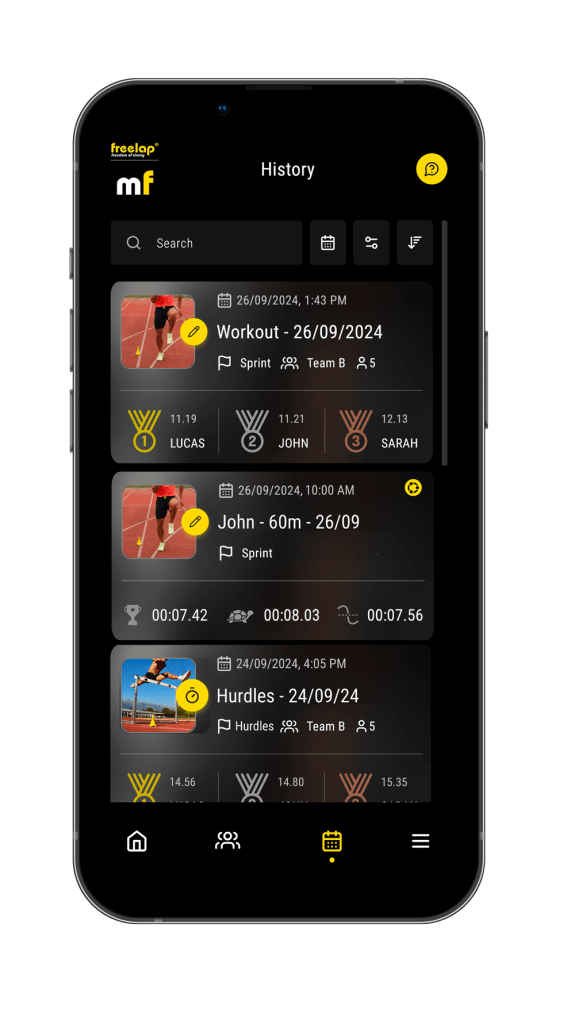
• Workouts overview
For each Workout is displayed: The date and hour / name of the Workout / Exercise / Team / number of athletes in the Team
Highlighted data: (displayed only when the Workout has already been performed)
– For Solo Workout: Best / Slowest / Average time.
– For Team Workout: The 3 best times and the corresponding athletes
Shared Workout:
– ![]() means this is a shared Workout. Click on it to know who shared this Workout with you.
means this is a shared Workout. Click on it to know who shared this Workout with you.
– ![]() means your Workout has been shared
means your Workout has been shared
Workout currently Live:
![]() : means this Workout is currently live.
: means this Workout is currently live.
Click on a Workout to enter it.
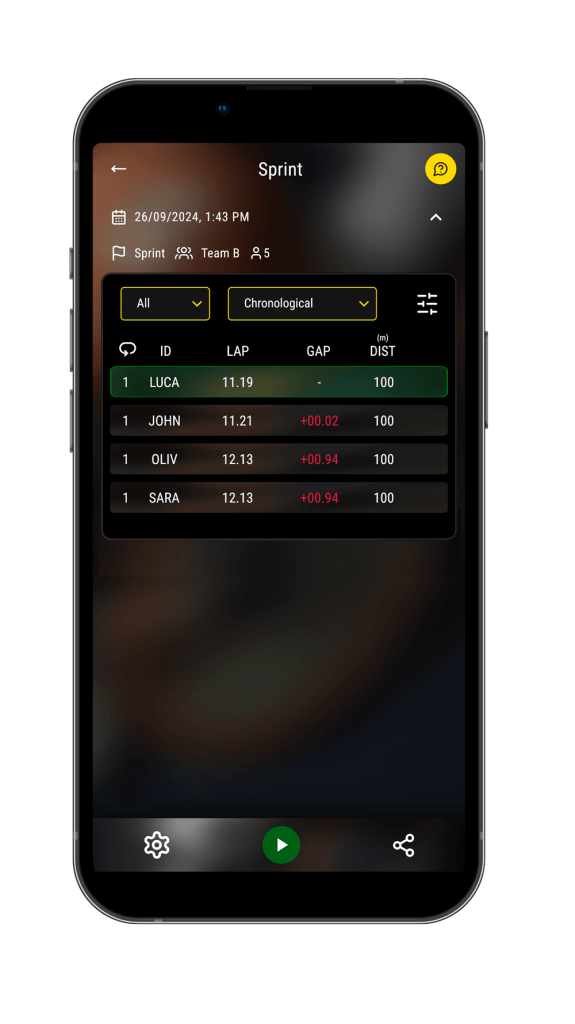
• Manage Workout
Click on a Workout overview to enter it.
From here you can view:
– Workout’s info (date and hour, name of the Workout, Exercise, Team, number of athletes in the Team.
> Click ![]() to hide the info section
to hide the info section
– All the data of the Workout
• ![]() : Modify the Workout settings
: Modify the Workout settings
• ![]() : Share / Export the Workout data
: Share / Export the Workout data
• ![]() : Start / resume recording data
: Start / resume recording data
The table displays all the data received. You can:
• Filter: By default the table displays the data of all athletes, but you can choose to filter the data table to display the results of only 1 athlete.
• Sort: By default the data are sorted in Chronological order, but you can change for Antechronological or Ranking order (from the best time to the slowest time).
• Customize the data to display: Click on ![]() to open the customization pop up. Then you can turn ON/OFF the type of data you want to display/hide using the switchers
to open the customization pop up. Then you can turn ON/OFF the type of data you want to display/hide using the switchers ![]() .
.
Note: Depending on the Exercises or on your Workout settings, some types of data can be unavailable.
• Press 3 seconds on a LAP line to delete it. You can select several times:
– Click on “Delete selected” to delete the selected times.
– Click on “Delete all data” to delete all the data of the Workout.
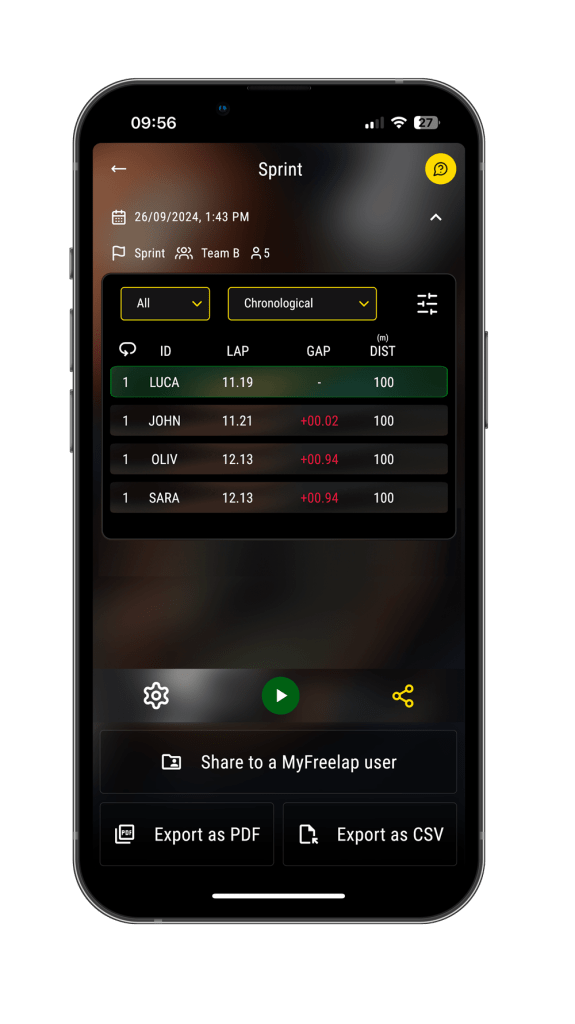
• Export Data
• First, from your app, choose the data you want to display. The app will export exactly the data which are displayed on the app. This way, for example, you can export only the data of 1 athlete if you want, choose to sort by ranking order, choose to display or not the time gaps etc.. by customizing the display of the data for this Workout.
Then from your Workout click on ![]() .
.
• You can choose between exporting as:
– .PDF
– .CSV file (spreadsheet).
Just click on the button and the file will be downloaded on your device.
• Check that you have set the separator you need: You manage this from the General settings > Csv separator. Usually “,” is used in Europe and “;” is used for other countries. If you have set the wrong separator, all the data will be displayed in 1 column. If so, change the separator settings and download your file again.
• Depending on the settings of the spreadsheet you are using it can happen that the times are changed into date. Most of the time it happens on Excel. To avoid this, please follow these steps to open your .csv file in Excel:
– Open a new empty Excel file
– Click on the “Data” tab
– Click on “From a txt/csv file”
– Select your csv file to open it
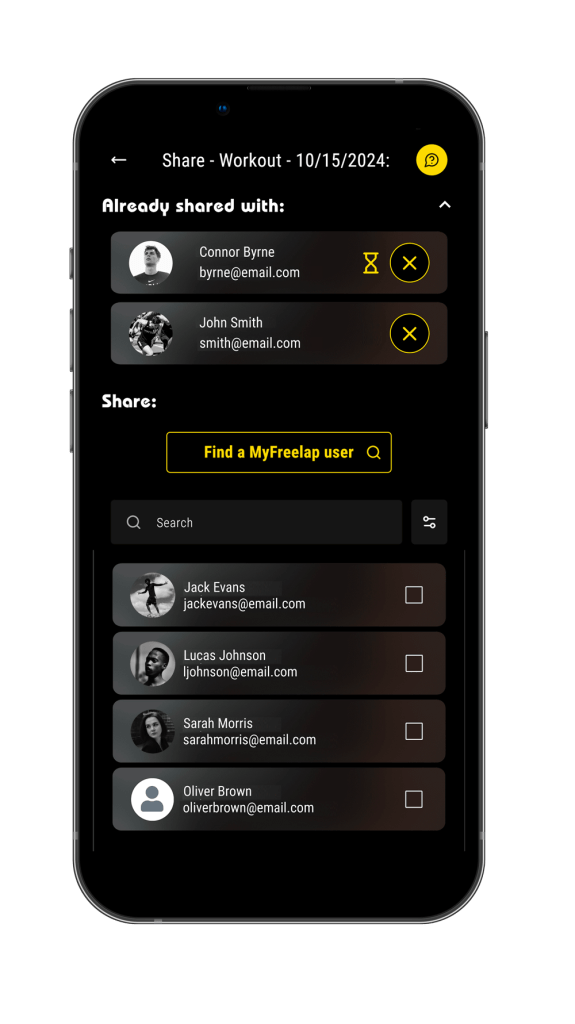
![]() When you share a Workout to another MyFreelap user, the app sends him a notification. The user can import the Workout or reject.
When you share a Workout to another MyFreelap user, the app sends him a notification. The user can import the Workout or reject.
• If the user accepts: He will see the Workout on his account. He will be able to:
– See the Workout details and the data
– Customize the display of the data table (it won’t affect the display on your account)
– Export the data.
– Delete the Workout (it will only delete it from his account, not from yours).
He won’t be able to start, stop, edit, share the Workout, neither delete data if he doesn’t have admin rights on this Workouts.
You can have admin rights on a Workout, if you are the creator of the workout or if you have admin rights on the Team used for this Workout.
• If the user rejects : He won’t see the Workout on his account.
Note: If a Team is used for this Workout, the Workout is automatically shared to all the admins of this Team, and they are automatically admins of this Workouts too, you have nothing to do.
